Nitro for VB
Torsten Damberg
Copyright May 11, 2000
Page 1
Introduction
...or what to do if VB reaches its limits
VB
is a very powerful language that supports nearly all modern
technologies. What makes VB so powerful? I think, that there are three
major reasons for that:
1. It is the easy syntax of Basic
itself. If someone ever tried C/C++, you will see that the syntax of
C/C++ is more abstract than Basic. If you take the time and really
learn C/C++ it will become as handy as Basic, but the beginning is
easier with Basic.
2. The creation of GUI is very simple. Have
you ever created an application, that heavily used GUI and then tried
to port it to C/C++? Have fun with it =(
3. VB is very
expandable through its strictly used COM concept. Every component,that
you use in VB (ActiveX controls, COM-DLLs(/components), VB classes
etc.) are based on the COM technology. COM-Components can be created
with nearly any modern language also with VB. Most of the
COM-components VB consists of are written in C++.
Using components written in other languages lets you use the vigorousnesses of these languages with VB.
The
main criticism to VB is, that the native VB language commands are
processed slower than in other languages (e.g. C++, Delphi, Smalltalk
etc.) But, hey, why not use VB as framework for your application and
write time critical functions in another language? This could make your
VB application rock. Take my GameAI-Lib as a living example for such a
task.
In this article, I will show you, how you can create a
COM-component using Microsoft Visual C++ 6.0 and how you can use it
within your VB application. The only things you need are the compilers
(VB and VC) and a little C++ knowledge. You will see, it will be very
easy.
Getting started
First, we will create a project in VC++:
From the VC++ IDE menu choose File->New and activate the tabpage
"Projects". From the procets-list choose "ATL COM AppWizard". Give our
baby a name. I named our lib "MyLib". This will be the name of the
COM-DLL and will also be the name of the TypeLib as you will find it in
the VB references list.
After that, press "OK" and VC AppWizard
will create a ATL COM Project for us. ATL means Active Template Library
and consists of a set of C++ template classes that make implementing
COM objects and interfaces much easier.
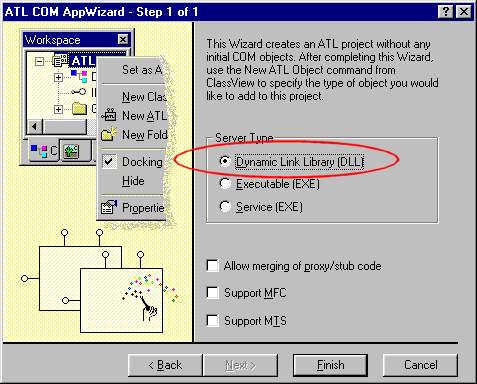
n
the next step of the AppWizard choose "Dynamic Link Library(DLL)" as
servertype. This will generate a in-process COM-component for us, that
means, it will run in the same process environment as our VB
application. Our component will have dependencies to the "atl.dll"
which is stored in your windows/system folder. You need to redistribute
and register it if you want to install your app on another machine. You
could also enable "MFC"-support, but if you do this your component will
have dependencies to the mfc dlls too. We won't do this.
Now press "Finish" and after that "OK". Your project and the source files will be created.
Our project workspace will now look like this:
Forget about that functions, I will not explain them and you will not need them.
Let it breathe
Now we have a library without any objects in it. Let's add our first
object (in this tutorial, we will only use one object, but added more
objects works analogically to this).
Move
your mouse over the MyLib classes root node and press the right
mouse-button. From the context menu choose "New ATL Object...".
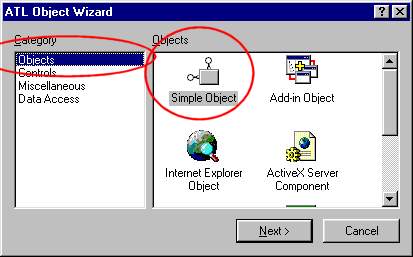
In the next dialog choose the "objects" category and mark "Simple Object" as object. Press next.
Enter
a short name for your object (this is VC++ internal, you won't see this
in your VB app). I choosed "MyObject". VC++ will create a C++ class
names "CMyObject" from this COM-object. You could rename it, but we
will keep that name. You can specify the name of the CoClass at the
"CoClass" textbox. This will be the name of the COM-object as it
appears in the interface description. That means, this will be the name
of the object as you will see it in VB. Press "OK".
Here
is our object. As you see, it only has a constructor "CMyObject()" and
a interface "IMyObject". We will now add a function to our object. This
function should implement a loop, that adds x times a value to 0 and
then return the result. So this is a multiply realised by adding a
value. Later on we will use this function to measure the time that our
C++ function takes and compare it with VB.
The function should get 2 parameters.
- lValue as Long ' this is the value that is always added
- lCount as Long ' lCount times will the loop be executed
-
- rc as Long ' this should be the return value
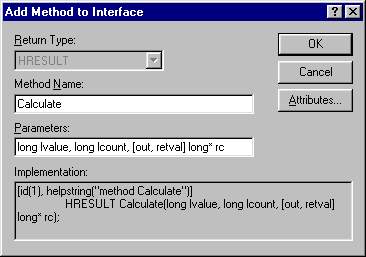
Move your mouse over the interface node and right-click it. From the popup-menu choose the option "Add Method...".
Give
our method a name. I took "Calculate". This will also the name as you
will see it in the VB IDE. Type in our parameter list:
- long lvalue, long lcount, [out, retval] long* rc
O.K.,
I think the first 2 parameters are clear if you understand a littlebit
about C++. But why is there a third input parameter with such a funny
declaration? And where is our return parameter?
COM interface
functions always have the same format: They have a variable list of
parameters and also return a return-code as HRESULT. If the HRESULT
isn't S_OK the function failed and a COM error is raised. The VC++ IDL
(Interface Decription Language) compiler interpretes the parameters
[out, retval] and declares the parameter as an out-parameter and as the
(one and only) return value. You must pass the variable as a pointer,
because this is the only way to get data out of this function. That's
the whole magic.
This is what our function looks like. Double-click it and the VC++ IDE
brings you directly to the source of that function. Enter the following
code:
- STDMETHODIMP CMyObject::Calculate( long lvalue, long lcount, long *rc)
- {
- long lresult = 0;
- for ( long i = 0; i < lcount; i++)
- {
- lresult = lresult + lvalue;
- }
-
- *rc = lresult;
-
- return S_OK;
- }
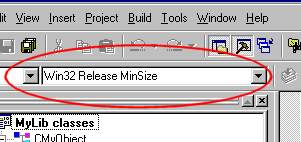
Compiling
We are finished. The last thing we have to do is compiling the component.
Choose
the compile option "Win 32 - Release MinSize" and compile your program
(menu: Build->Build MyLib.dll) The VC++ compiler will build your
component and register it, so it is ready to use.
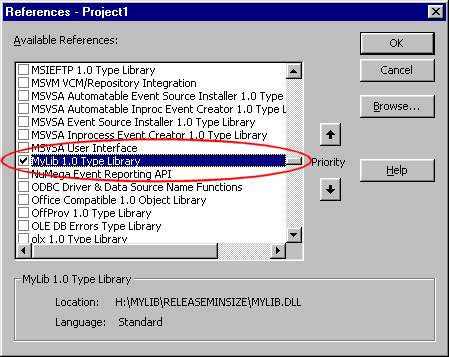
Using it with VB
Create a new VB project and add a button to it. From the menu, choose project->references and pick our component:
Press OK and you are ready to use the library in our sample VB project. Within the button-code add the following code:
- Dim oMyObject As New MyObject
-
- MsgBox Format(oMyObject.Calculate(2, 5000000))
Now
we are ready with this tutorial. Try the Sample (check the link at the
button). In the sample, I have implemented the same functionality in
VC++ and in VB. Compare the speed of both version. But try it more than
once, because our VC is loaded for the first time into memory. This
will cause our first execution a littlebit slower. Remember, that this
calculation is pretty uncomplex. You can get a lot more out of it.
I
hope this tutorial will help you develope VC++ COM-objects for VB. If
you have any question about using other data-types than "long", ask me
or take a look at msdn online or the VC++ online manual (OLE types).
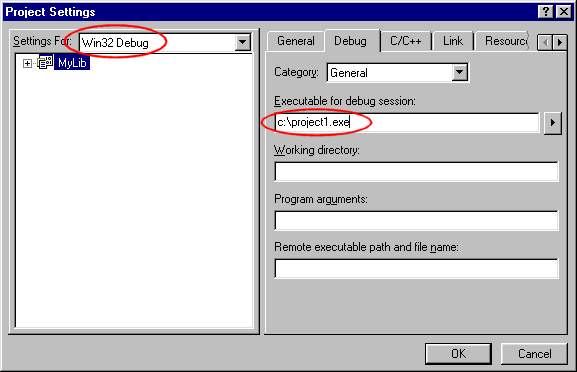
Tip
- Debugging our component with VC++
How can I debug this object if
it is used from VB? This is easy: Make an executeable (project1.exe)
from your VB project. In VC++ set the compile option from "Win 32 -
Release MinSize" to "Win 32 - Debug".
Specify the VB project.exe as executeable for the debug session and set
a breakpoint in your code. Now press "F5" to "run" your component.
After that the VB application is started and if you reach the
breakpoint the VC++ debugger will stop at the C++ code. That's it.
Download the source: You can download the source of the tutorial here.